User Guide
- 1. Before Installation
- 2. Installation
- 3. Launch SimSANs Agent and Console
- 4. Launch SimSANs Engine
- 5. Terminate SimSANs Engine
- 6. Create New SimSANs Engine
- 7. Configure SimSANs Engine
- 8. Monitor Live SimSANs Engine Run
Before installing SimSANs package, user should familiarize with the following terms:
- SimSANs Engine (Engine): The OMNeT++ based SimSANs simulation instance.
- SimSANs Management Agent (Agent): The utility to directly control and operate Engine by accepting the commands from Console.
- SimSANs Management Console (Console): The GUI tool to remotely control and operate Engine via Agent.
- Backend Agent Host: The host running Engines and Agent utility that communicates with frontend Console host via TCP.
- Frontend Console Host: The host running Console GUI that communicates with backend Agent host via TCP.
- Online Engine: The simulation Engine that is currently running on the Agent host.
- Offline Engine: The simulation Engine that is not yet launched.
It is always recommended that the Console and Agent are launched from separate hosts, however, they are allowed to run from the same host.
User needs to install both Console package and Agent/Engine package before launching simulations.
- Create Root Directory: Currently SimSANs v3 only runs on Windows platforms. Assuming the root directory to install the packages is C:\SimSANs_v3_Root\ for both Console host and Agent host.
- Install Console Package: In Console host, copy SimSANs_v3_MgmtConsole.zip to the root directory and unzip it. This will add Console binary SimSANs_v3_MgmtConsole.exe in the root directory. It is suggested to create a shortcut for the binary.
- Install Agent/Engine Package: In Agent host, copy SimSANs_v3_ExecRoot.zip to the root directory and unzip it. This will add Agent and Engine binaries in the root directory. It is suggested to create a shortcut for the Agent binary SimSANs_v3_MgmtAgent.exe.
- (Option) Run Console and Agent/Engine from the same host: User can choose to run both Console and Agent/Engine on the same host, so simply copy the SimSANs_v3_OneHost.zip to the root directory and unzip it.
3. Launch SimSANs Agent and Console GUI
SimSANs simulation (the Engine) is launched and controlled by Console GUI issuing management commands to the Agent, which further operates the simulation run and management at the backend. User is not required to manually run the Engine, neither is this recommended. Simply follow the steps below to launch and manage SimSANs simulations:
- Launch Agent: On the Agent host,
launch management Agent binary
(ROOT)\SimSANs_v3_MgmtAgent.exe either from command line or
by shortcut if there's one created. Agent window then pops up.

- Get Agent Ready: The Agent window shows the host IP as well as the default listening TCP port, 10028, for accepting incoming requests form Console. It is not recommended to change the default TCP port unless there's port confliction. Simply click "Start Listening" button to get Agent ready to accept management commands.
- Launch Console: On the Console
host, launch Console binary
(ROOT)\SimSANs_v3_MgmtConsole.exe either from command line or
by shortcut if there's one created. Console window then pops up.

- Connect Agent: User needs to input the Agent host IP as
well as the TCP port (default 10028), then click "Connect"
button to connecting the Agent host. Once connection is created
successfully, connection status should shows "Connected",
otherwise the error status shows up. The success connection will get
a bunch of Engines listed in the "Back-end
Engines" box, either Online Engines
or Offline Engines. User then can
follow section 4 to 8 to control those Engines.


From the "Offline Engines" category, choose the Engine to run, then right-click to choose "Start Engine" from the menu. This will get backend Engine simulation to launch. The following picture shows the start engine menu:

Once the Engine is launched successfully, the simulation begins running. The Engine then becomes Online Engine. Each online Engine will be assigned an unique non-zero ID, Online Engine ID, by the backend Agent. See the following picture:

Note: only Offline Engines can be launched. Existing Online Engines have to be terminated before re-launch.
Only Online Engine can be terminated. Right-click the Engine name to terminate and select "Terminate Engine" menu, this will get backend simulation to stop running. Upon successful termination, the Engine will go to "Offline Engine" category.

Please follow the steps below to add a new Engine:
- On the backend Agent host, go to directory (ROOT)\SimSANs_Engines\ and copy one of the existing Engine directories, for example, "Simple_FC_SAN" to a new directory and rename it to, say, "SS_ENGINE_03", the new Engine name. Note: Engine name cannot be larger than 15 characters.
- Go back to (ROOT) directory and
create a new batch file, named "Start_new_engine_name.bat"
(in this example, it will be
Start_SS_ENGINE_03.bat) and put the following two lines into
the bath file (please replace
new_engine_name with the real Engine name)

- Close Agent utility and re-launch, then click "Start Listening" button to get Agent ready to populate new Engines to the Console.
- On the frontend Console host, close Console application and re-launch it, then click "Connect" button to connect to Agent, the newly created Engine will show up in the "Offline Engine" category.
- Now user can configure the new Engine and launch simulation run.
Currently "Create New Engine" involves some manual work on the backend Agent host. An "Add New Engine" menu will be added to the frontend Console to do the work automatically.
Configure SimSANs Engine requires a bit of SAN background knowledge, including but not limited to: SCSI Initiator, SCSI Target, WWN, FC SNS, Zoning, IO Patterns, etc. User can find them in FAQ page.
This section gives some basic ideas of how to configure Engine:
- Launch Engine Configuration: Right-click the Engine
under "Offline Engines" category, and
select "Config Engine" menu, the Engine
configuration window will pop up. Note: only offline Engines can be
configured, online Engine cannot configure until it is brought
offline.


- Configure Host Properties: The host generic properties,
HBA adapter ports, SCSI initiator attributes, IO generators, and CPU
settings can be configured from here. Please select one of the hosts
in the "Host Farm" box and then select
the property from "Host Properties" box
and configure it from "Config Item Settings"
box. User is also able to add new hosts, delete hosts, and clone
hosts. Note: only the last host can be deleted. To delete the host,
right-click the host and select "Delete Host"
menu. Also, existing IO Generators can be deleted or new IO
Generators can be added. From the "Host
Properties" box, right-click "IO
Generators" category and select "Add New
IO Generator" menu to add a new IO generator. Right-click any
of existing IO generators and select "Remove IO
Generator" menu to delete it.


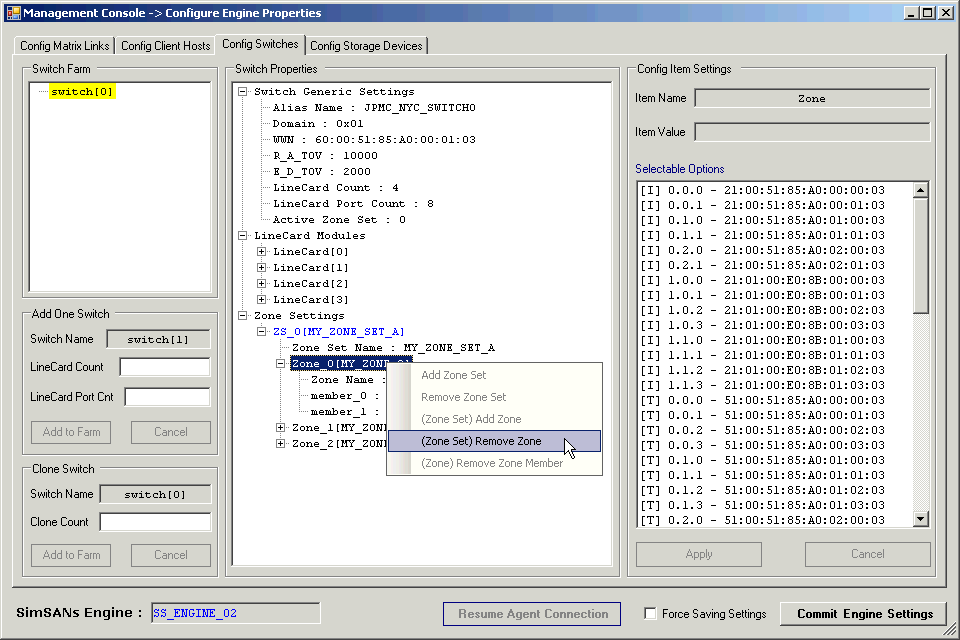
- Configure Switch Properties: The switch generic
properties, linecard module ports, and zone settings can be
configured from here. Please select one of the switches in the "Switch
Farm" box and then select the property from "Switch
Properties" box and configure it from "Config
Item Settings" box. User is also able to add new switches,
delete switches, and clone switches. Note: only the last switch can
be deleted. To delete the switch, right-click the switch and select
"Delete Switch" menu. Also, existing
zones can be deleted or new zones can be added. From the "Switch
Properties" box, right-click the zone set name and select "(Zone
Set) Add Zone" menu to add a new zone. Right-click any of
existing zones and select "(Zone Set) Remove
Zone" menu to delete it.


- Configure Device Properties: The storage device generic
properties, CHIP (or FEIB)
module ports, LUN configurations and assignments, Client assignment,
and CPU settings can be configured from here. Please select one of
the devices in the "Device Farm" box and
then select the property from "Device
Properties" box and configure it from "Config
Item Settings" box. User is also able to add new devices,
delete devices, and clone devices. Note: only the last device can be
deleted. To delete the device, right-click the device and select "Delete
Device" menu. Also, existing LUNs can be deleted or LUNs can
be added. For the client assignment, initiators and targets can be
specified to associate with the client, and LUNs can be assigned.
See the following pictures for more details:


- Configure Matrix Links: This is where the link
connections to be configured between Node Port (host or device port)
and Fabric Port (switch port). A switch port layer will show up in "Switch
Links" box for the switch selected in "Engine
Farm" box. At most 8 Linecards (LC-0 to
LC-7) can be configured, with each of which has at most 32 (0
to 31) ports configurable. The actual number of Linecards and
ports per Linecard shall be specified in "LineCard
Count" and "LineCard Port Count"
in the "Switch Properties" box of "Config
Switches" tab. There are three types of ports in terms of
configurations: Configured Online Port
(Green), Configured Offline Port
(Yellow), and non-Configured port
(Dark Gray). By clicking a configured online port, the "Config
Links" box shows the link connection between this F_Port and
the N_Port on the other side of the link. By clicking a configured
offline port, the "Config Links" box
shows this F_Port as well as a list of ports that user can select to
connect to the switch. See the following pictures for details:


- Commit Engine Configurations: Once user is done with
the configurations, simply click "Commit Engine
Settings" to save the changes to the configuration files
reside on the backend Agent host. Once Engine data is saved
successfully the Agent will return a confirmation message,
otherwise, error messages will be returned.

- Get Back to Console Main Windows: Simply close configuration window to get back to the Console main window. Note: any unsaved changes will be lost when exiting configuration window.


8. Monitor Live SimSANs Engine Run
Once an Engine simulation is launched, user can monitor the live simulation status for the following categories: SAN Port, SCSI Initiator, SCSI Target, SNS, Zone, and Fabric links. Please follow the instructions below:
- Get Engine Live Data:
Engine live data has to be collected before checking the status of
the above SAN categories. Right-click the Engine name you want to
monitor in the "Online Engines" category
from the "Back-end Engines" box and
select "Get Live Engine Data" menu. Once
the Engine data is returned, the Engine name as well as its
entities
will show up in the "Engine SAN Farms"
box.


- Fabric Connections: This is for
switch entity only so user needs to select one of the
switches from the "Engine SAN Farms"
box. From the "Switch Links" graph,
select one of the ports: Green port
means the cable connection between this Fabric port and remote Node
port is online, and the port information shows up on the "Link
End Ports" box. Yellow port means
there's a cable connection created, however, the Node port is
offline (laser is off).

- Name Servers (SNS): This is for
switch entity only so user needs to select one of the
switches from the "Engine SAN Farms"
box. The following table shows the meanings of the basic SNS
attributes.


- Zone Set and Zones: This is for
switch entity only so user needs to select one of the
switches from the "Engine SAN Farms"
box. Only current active zone set along with its associated zones
will be displayed. Simply click the zone name will get its zone
members shown up in "Zone Members" box.

- SAN Port: This is where user can check SAN Port
attributes, for example, link status and data rate, etc.
Any of the three types of entities
(host, switch, or device) can be selected from the "Engine
SAN Farms" box. For host entity, it is the SAN Port in
HBA Adapter Module. For switch entity,
it is SAN Port in Linecard Module. For
device entity, it is the SAN Port in FEIB
(or CHIP) Module.


- SCSI Initiators: This is for host entity only so user
needs to select one of the hosts from the "Engine
SAN Farms" box. The SCSI Device list (in A:C:S:L format,
i.e., adapter-channel-scsiid-lun) as well as initiator-target
associations are displayed in the "SCSI Devices"
box. Click one of the SCSI devices or LUNs will show the device
properties in "SCSI Device Properties"
box.

- SCSI Initiator IO Performance:
For host entity, initiator device IO performance can be collected by
click "Refresh Perf Data" button in the
"IO Statistics" box. Currently on the
backend simulation Engine, performance data is collected every 50ms
(milliseconds). This time interval will later be made tunable in "General"
tab. Note: IO Statistics data is also saved in the Engine directory
in the backend Agent host. The file name is
host[x].ioGen.stats, where x is the host index. The
statistics file can be growing very large (several hundred
mega-bytes to multiple giga-bytes) so user is highly suggested to
reserve large disk spaces for the Engine directories.

- SCSI Targets: This is for device entity only so user
needs to select one of the devices from the "Engine SAN Farms" box.
Target LUNs, target controllers, and Client assignments are
displayed in the "Client and Assignments"
box. Click the LUN will get its attributes shown up in the "LUN
Properties" box.

- SCSI Target IO Performance: Same as
SCSI Initiator IO Performance except this
is for device entity only.

- General Tab: Currently is under development. Some SimSANs simulation wide global parameters will be pub in here for user to tune it dynamically.
- Update Engine Data: To refresh and get the latest Engine data while the simulation is running, user has to issue "Get Engine Live Data" command again.


